Showing posts with label Meat. Show all posts

March 20, 2014

Mutton Chop (Beach Road, Singapore style)

It feels good to drop by my blog, which I have somewhat abandoned temporarily in the name of other pursuits such as raising and developing my toddler - attending her playgroups and devising developmental activities at home - spring cleaning the house which is never ending and trying to finish a course, to name just a few. Despite the silence on this blog, I am still cooking. I have attempted to eat out more than before but each time I finish my meal, I will leave the eatery as a dissatisfied diner. It's hardly tasty. Thus, I'm more and more convinced that home cooking rocks. Hehe.

Cooking these days is all about quick, nutritious and yummy food as I am spending more time on my little one. Make no mistake then that I would often go thru my gastronomy memory bank for recipes I grew up with and food I adored from Singapore. I have many. Too many. This Indian fare which is a common hawker centre food in Singapore is just one of them. I had my first plate of Mutton Chop probably at 7 yrs old. On hindsight, I must have stuffed myself with excessive red food colouring often used with the meat, not to mention the recycled oil used in the frying of the potatoes by the food seller. Yikes!

Not wanting to give up on one of my fav food, I decided I could change some of the ingredients to produce a healthier version of the dish. For instance, I used olive oil for everything and completely omitted the red food colouring. I also used pasta sauce for more flavour in place of canned tomato puree and ready to fry and pre-seasoned frozen potato wedges as opposed to actual potatoes that need to be de-skined, washed and cut up in order to save on preparation time. That's the beauty of home cooking, you control what goes into your system :)

Serves 2-4
Ingredients:
For marinate
500g mutton or beef steak (diced)
4 tbsp light soy sauce
6 tbsp sweet soy sauce (kicap manis)

For meat sauce
10 tbsp tomato puree or pasta sauce
3 tbsp tomato ketchup
2 tbsp sugar (+/- based on preference)
1 tbsp chilli paste (+/- based on  preference). I used the ready to use one as pictured. In Spore "chilli boh" is commonly used and available.
2 tsp coriander powder
2 tsp cumin powder
Light soy sauce
Sweet soy sauce (kicap manis)
Oil for frying

Other accompaniments
Frozen potato wedges
Tomatoes
Cucumbers
Snow peas (blanched)
Eggs fried sunny side up

Method:
1. Marinate meat with the sauces for at least 30mins.
2. Fry the potato wedges, eggs. Set aside.
3. Heat 3 tbsp of oil in a pan and fry the marinated meat until lightly cooked. Take meat off pan and set aside.
4. Clear the pan of any left over liquid (don't discard, can add to sauce if it requires more liquid)
5. Heat 2 tbsp of oil in the pan. Add pasta sauce or tomato puree, chilli paste and tomato ketchup. Sautee the ingredients over medium heat, stirring them occasionally for abt 3-4 mins.
6. Add the light & sweet soy sauce to taste. Add the cumin and coriander powder. Stir the ingredients well.
7. Add the pre-fried meat cubes and stir the ingredients making sure each meat cube is sufficiently coated with the sauce. Let the ingredients cook for abt 3-5 mins and the sauce slightly thickened.  If too thick, add the leftover liquid from the meat. Add sugar and let it caramelise for a while before turning off the heat.
8. Adjust the taste to your liking. The sauce should be a little sweet and sourish and if you prefer, hot (spicy) as well. Add more/less sugar/chilli to taste. Serve with the rest of the accompaniments.

November 23, 2010

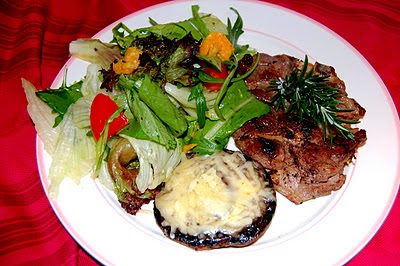
Lamb Chop with Cheesy Flat Mushroom & Salad


I put this meal together by accident. I mean, when I opened my fridge and saw lamb, mushrooms, cheese, yada, yada, yada I didn't have a clear concept of what I'd do with them.  I stared long and hard at those ingredients, long enough for my fridge to beep deafeningly, signalling that I'd left the door ajar for a while (and I think I heard it exclaim, "Make up your mind for a meal now!").  As I shut the fridge door and shifted my glare to the kitchen top, images of my favourite celebrity chefs (read: Jamie Oliver, Curtis Stone and the likes) played in my head.  Sorry to disappoint you, I wasn't fantasizing anything for mature audience only but I was recollecting recipes I've seen them make with similar ingredients I had on hand at that time.  Pure thoughts all the time!

I love the meaty and succulent taste of this Large Flat Mushroom
(Photo credit: taste.com.au)

Greek salad used to be my top favourite salad.  But eversince I started using freshly squeezed orange juice for my DIY salad dressing, I've never looked back.  It's so organic and refreshing.  I've managed to seduce my husband into loving orange salad as his ultimate favourite too.  I see that as an achievement because he's a true blue salad eater who most certainly knows what he wants in his greens.  So, there.  I would like to be a contender for "Swing Your Husband to Like Your Salad" reality TV contest, if there's any.  

I've never loved lamb so much until I came to Australia.  You can't blame me for having developed frequent "lamb cravings" because the meat here is so fresh, sweet and succulent everytime.  It's got to do with the fact that Australian lamb is entirely grass-fed, reared on pasture. Marvellous!  As we have heaps of rosemary growing in the garden, I didn't have to think twice about seasoning the lamb for this dish with the magical herb. The aroma is so delectable and therapeutic that it's almost aromatherapy on the grill.  And that flavourful, cheesy mushroom - I can't find a suitable expression to tell you how heavenly it is.  You've got to try it to understand my speechlessness.    


Ingredients:
(Serves 1)

250g lamb chop
1 large Flat Mushroom - remove stalk
3 tbsp shredded Mozarella cheese
2 leaves iceberg lettuce
2 leaves red lettuce
1/2 cup rocket salad
1 tomato - wedged
1/2 fresh orange
1 stalk fresh rosemary (optional)
Olive oil
Salt & pepper to taste


Preparation:

1.  Season lamb with salt & pepper.  Heat pan with 1 tsp olive oil.  Fry lamb (or grill it if you prefer) with rosemary herb on low-medium heat for 7-10 minutes on each side, then fry each side again on high heat for 2 minutes until lightly charred but meat is still tender.  Remove meat from heat.

2.  Season mushroom with salt & pepper.  Using the same pan (with the lamb flavour), sautee the mushroom 3-4 minutes on each side or until mushroom is softened and cooked.  Remove mushroom from heat.  Turn mushroom so the flat head is resting on a plate.  Sprinkle mozarella cheese onto the mushroom and microwave on high for 5 seconds (just enough for the cheese to melt onto the mushroom).

3.  In a salad bowl, combine all vegetables.  Add 2 tbsp olive oil, salt & pepper.  Squeeze orange juice onto salad, scrape the leftover orange pulps and add them to the salad.  Toss salad to harmonize the ingredients.

4.  Serve lamb, mushroom and salad on a plate.


Tips:

- You can vary the vegetables for salad to your liking.
- Orange can be substituted with lemon or grapefruit.
- Serve with BBQ/ketchup/chilli sauce, if desired.


Fearlessly Simple & Home Cooked

November 18, 2010

Daging Masak Kicap (Sweet Soya Sauce Beef Stew)


If there is one Malay dish that deserves the world's attention, I would not hesitate to nominate "Daging Masak Kicap", an elegant and beautifully aromatic beef stew.  I have cooked this awesome dish and served it to family members and guests of various ethnic backgrounds and taste palettes so many times that I have lost count.  What remains vivid in my memory though is everyone's delightful "Hmmm" and "Oh wow!", followed by "What's the recipe for this, please?".  My husband loves this dish so much that he nearly petitioned for me to make it everyday.  Typically eaten with plain white rice, it's one of my personal favourites too.  Although I have been eating it since I was a toddler because my mum made it wonderfully, I still go "oooh!", "aaah!" with every bite of my own version.  I must have gotten the knack for making this dish from my mum. So, this one's made lovingly in her honour.      
          

Champignons a.k.a button mushrooms are sold in cans.  I adore the soft and rubbery
texture of these little gems

When you were looking at the first picture above, I bet visions of the French's traditional stew, Beef Bourguignon, were playing in your head.  Uncanny resemblance, huh? I have never tried making BB but I remember a scene from the movie "Julie & Julia" in which Julie, while making BB, fell asleep and nearly burnt her kitchen down - the result of an elaborately long cooking time.  If you're anything like me - enthusiastic about cooking but a little lazy to wait around the stove or oven for hours - Daging Masak Kicap will bring you instant gastronomic pleasure minus the sweat.  It is sweet, salty, aromatic and mildly spicy (coriander & cumin seeds).  A bonus if you could get the right cut of fresh and tender meat as every bite of the succulent beef promises an ultimate satisfaction.     


With rice or bread, this Daging Masak Kicap is a crowd-pleaser

If red wine is the answer to a good BB, the non-alcoholic secret weapon for this Malay stew is "kicap manis" (sweet soya sauce).  There are many Indonesian versions of the sauce and there are varieties of Chinese sweet soya sauce too.  But the one that does the trick for this dish is Habhal's Kicap Manis Cap Kipas Udang from Malaysia.  Remember that brand, a mouthful notwithstanding.  I can write a lot about this outstanding sauce and make everyone familiar with it drool on their computer keyboard or iPhone but I'll leave that to next time.  Suffice to say that it is so good, it even has its own Facebook fanpage. If you're living in a non-Asian country, globalisation has enabled us to find exotic or foreign ingredients pretty easily in the Asian section of major supermarkets.  I nearly clapped my feet in the air for having found Habhal's Kicap Manis Cap Kipas Udang at my grocer's here in Australia.  Daging Masak Kicap for world domination! Yeeeha!


Some of my comfort food including Habhal's Kicap Manis
Cap Kipas Udang (bottle on right)


Ingredients:

Grind to form a paste
2 large red onions
4 cloves garlic
2cm fresh ginger
1 tsp coriander seeds
1 tsp cumin seeds 

****

500gm gravy cut beef - cut into 4cm cubes, wash and drain
1 tbsp chilli or curry powder
1 fresh carrot - cut in 1/2cm circles
2 potatoes - deskinned and cut in wedges
1 can of champignons - cut into halves
100ml Habhal's Kicap Manis Cap Kipas Udang (or any Indonesian sweet soya sauce)
1 cinnamon stick
2 star anise
2 cloves
2 cardamoms
1 1/2 cups water
Cooking oil
Sugar to taste 
Coriander/parsley leaves for garnishing


Preparation:

1.  In a medium non-stick pot, heat oil and add cinnamon stick, star anise, cloves and cardamoms.  Add the ground paste and chilli/curry powder.  Fry for 3-4 mins until fragrant.  Stir occasionally to prevent paste from sticking to the base of the pot.

2.  Add beef.  Fry and stir the paste until beef is lighly covered. 

3.  Add kicap manis (soya sauce) and water.  Let it simmer for about 20-30 minutes until beef is tender, stirring it occasionally.

4.  Add potatoes and boil further until the potatoes are soft.  Add carrots and champignons.  Add 1-2 tbsp sugar to taste.  Cook until the stew becomes slightly thicker and meat fully tender.  Turn heat off and serve with white rice or bread.    


Tips:

- Other vegetable subsitutes include baby corns and tomatoes.  If tomatoes are used, add it just before turning heat off to prevent them from bleeding and getting over-cooked.

- This stew can be kept in the fridge for days.  Re-heat in microwave when serving left-over portion.


Fearlessly Simple & Home Cooked

Pulut Serunding (Savoury Glutinous Rice with Spicy Coconut Floss)

My Cooking Affairs wishes you
Eid ul-Adha Mubarak!


Eid ul-Adha in Australia was celebrated on 16 Nov this year, one day ahead of that in Singapore and in most countries.  In addition to the religious significance of a special occasion as such, families all over the world would also gather for a feast (partial lyrics from "Hotel California" eh?).  In the Malay households, there are many signature dishes for Eid. Too many for me to list here.  I have my favourites, one of them is "serunding".  I can't quite recall how my love affair with this flossy side dish started.  All I know is I eat it with anything I could get hold of - rice, bread or lontong/ketupat (Malay rice cakes).  In case you start picturing someone (me) gobbling all of the aforementioned in one go with "serunding", take heart. I meant to say either of them at any one time, not all at once.  

In case you think that hairy brownish ball (left) is a meteorite, I have to quickly say
that's a real coconut. The white flesh (right) when grated will result in tiny flakes   

I did the most unexpected. Well, nothing rocket science, just a little bit of an old school technique.  I actually bought a whole coconut (dehusked) and grated the flesh by myself! The last person I saw doing that painstaking task was my mum, when I was 8 years old.  I would help her out sometimes.  I was always fascinated with the coconut milk that came out of every squeeze of the grated flesh.  Through the years, machines have taken over labour functions in a manner that's almost unbelievable.  Today, coconut milk comes in a can.  Even my mum now buys it ready made like that.  Lest the future generation thinks metal tin is the primary source of coconut milk, I think it's worth preserving and practising some traditional technique whenever we can.  So, when I came across coconuts at the supermarket, I grabbed the chance to relive my childhood. And boy, did I grate and squeeze!

While serunding is a side dish, I decided to make Pulut Serunding, which is a traditional Malay savoury dessert or what we Malays call "kueh".  No prizes for guessing that this is one of my favourites because the main feature is serunding.  I love the chewy texture of the glutinous rice combined with the fragrantly sweet/sour/spicy taste of the serunding.  Simply mouthwatering!  And for nostalgia's sake, I served my Pulut Serunding on a banana leaf.    

(From L to R): Freshly squeezed coconut milk and coconut flakes, lightly fried (without oil) coconut flakes
and a tub of glutinous rice in coconut milk and pandan leaf (screwpine leaf) ready to be cooked  


Ingredients:

Serunding (Coconut Floss)

Grind to form a paste
2 lemongrass
4 cloves garlic
1 large red onion
1cm galangal
2 tsp coriander seeds
1 tsp cumin seeds
10 dried chillies (reduce quantity if you prefer less hot)

****

Coconut flakes from 1 whole coconut
350gm minced beef (fried without oil)
100gm brown / palm sugar
5-6 kaffir lime leaves
1 tumeric leaf (optional)
1/2 cup tamarind juice
Salt to taste
Cooking oil


Preparation:

1.  Lightly fry the coconut flakes until they turn slightly yellowish.  Set aside.

2.  In a medium saucepan, heat oil and fry the ground paste for about 5-7 minutes until fragrant.  Stir the paste occasionally while frying to prevent it from getting burnt.

3.  Add the minced beef.  Stir for about 20sec.  Add the tamarind juice, followed by the coconut flakes, sugar, salt, kaffir lime leaves and tumeric leaf.  Lower the heat.  Stir all ingredients well and cook until the coconut flakes get drier.  Be sure to stir regularly to prevent the mixture from sticking to the bottom of the pan. 

4.  When the mixture is not soggy anymore, that's the right consistency.  Turn heat off.  Taste that the floss is a little sweet, sour and salty.  Otherwise, add sugar/tamarind juice/salt to taste.


Pulut (Glutinous Rice)

3 cups glutinous rice - washed & drained
3 cups coconut milk
1-2 pandan leaves (screwpine leaves)
Salt to taste


Preparation:

1.  Put glutinous rice, coconut milk, pandan leaves and salt into a microwavable container and cover with lid.  Cook on high for 15 minutes.  Pause microwave every 5 minutes to gently stir the rice.

2.  When rice is cooked, remove container from the mircowave.  Remove the lid, cool rice for 1 minute.  Scoop the desired amount of glutinous rice into a small bowl to make a round shape.  Invert bowl so rice is released on a plate.  Sprinkle a generous amount of serunding onto the glutinous rice and serve.     


Tips:

- Glutinous rice must be used to make "pulut" as it is sticky, which is the texture desired for this dessert.  Normal grain rice will not give the sticky effect.

- Minced beef is optional for the serunding.


Fearlessly Simple & Home Cooked

October 15, 2010

Homemade Beef Burger


Fast food.  Who doesn't like them regardless of how many times we've been reminded that they triumph in the category of junk food?  Remember "Supersize Me"?  It appears that the documentary hasn't deterred many of us from gobbling up burger after burger.  And as if defying all healthy living advices, we drown ourselves with colas and bellow in unison - I'm Loving It!  Hands up - YOU, YOU, YOU, ME!  Guilty as charged!  

Ever been disappointed by how the puffy, sesame seed coated bun you see on the glossy posters turns out to be flat and shrunk on your tray?  Welcome to the world of Food Make-up Artist.  I figured I should embark on a personal crusade to stop the deception, pronto.  With beef in top notch quality here,  there's also no reason to eat sub-standard processed meat to get my burger fix.  I was only too happy to make my homemade beef burger patty from fresh red meat we ground at home.  I then assembled the burger by piling on pickled cucumbers, sauteed mushrooms and cheese.  Voila! WYSIWYG - what you see is what you get.

It's so simple, even your six-year-old can help out.  Because it's homemade you know exactly what goes into your burger - the portion of meat you use, the oil you prefer and even customised toppings to suit your mood.  Count the calories if you must and add or subtract the meat portion as you like.  Supersize your burger without going on a guilt trip - how does that sound to you?

Ingredients:

(Makes 8+ burgers)
Hamburger buns
Sauteed wild mushrooms
Pickled cucumbers, sliced
Iceberg lettuce, shredded
Cheddar cheese, sliced

For beef patty
650 grams ground beef
4 garlic, chopped
1 large brown onion, chopped
1/4 cup fresh continental parsley, chopped
4 tbsp breadcrumbs
1 egg
1 tbsp butter (if non-fatty meat portion is used)
1 tbsp Worcestershire sauce or BBQ sauce
Pepper & salt to taste

Preparation:

1.  Mix all beef patty ingredients in a large bowl with your hand.  Ensure they are well mixed before covering the bowl with a plastic wrap and leaving the mixture to set in the fridge for 30 minutes.

2.  Grab the beef patty mixture, slighly smaller than the size of your palm.  Roll it into a ball and flatten it to abt 10cm in diameter.

3.  Heat olive oil in a non-stick pan.  Fry beef patty over medium-low heat, pressing it occassionally.  You can use the flat surface of your hand-held metal potato masher for this.  Cook meat thoroughly.

4.  Cut burger bun into halves and place them on the heated pan for about 30-50 seconds.  This will give a toasted crispy surface onto which you will place the cooked patty. 

5.  Pile the burger to your preference with the accompaniments like mushrooms, cheese, sauces, etc.


If the goodness of homemade burger still doesn't get you moving, watch this video and think again.  I had fun seeing my students' reactions when I showed this video during one of the previous Marketing lessons I taught.


Fearlessly Simple & Home Cooked

October 14, 2010

Hyderabadi Chicken Biryani Rice


My kitchen experiment with Hyderabadi Chicken Biryani Rice happened quite accidentally.  I was beguiled by an Indian chef on Youtube one fine day in Ramadan, as I was researching on what to cook for the day's iftar (the meal to break fast).  He not only makes cooking an elaborate dish like this seem like a cinch, his eyes enlarge at every emphasis of the dish's deliciousness.  At the risk of sounding like a Michael Jackson publicity trailer, I decided then "THIS IS IT!".  I would make biryani for iftar and in the process of it, immerse myself in spice therapy.
As Singapore is a fantastic melting pot of cuisines, I have very good recollections of biryani.  Biryani there comes in all tastes and sizes.  There are chicken, beef, mutton and fish biryanis.  It's traditionally (and best) eaten with your own fingers, like many Malays and Indians graciously do.  Right hand, not left.  I can't explain the delight but it's probably something to do with the intimate connection between the food and your own skin. 

For me, the biryani aroma that sticks to the fingers thereafter is nothing short of divine!

This version of biryani involves cooking the meat in and together with the rice


Ingredients:

1 whole chicken, cut into 6 parts
4 cups Basmati rice
2 green cardamons
2 black cardamons
1 tbsp mace (javetri)
1 tbsp black cumin seeds
1 tbsp peppercorns
1 cinnmon stick
4 cloves
1 tbsp tumeric powder
2 tbsp ginger & garlic paste
2 green chillies
2 bay leaves
1 cup mint leaves
1 cup coriander leaves
1 cup fried shallots
1 tbsp cumin powder
1 tbsp coriander powder
1 tbsp chilli powder
2 cups yoghurt
5 tbsp cooking oil
1 lime
Salt to taste
A few strands of safron
Water

If the list of ingredients appears exhausting to you, you could also use the ready made Biryani Masala Mix from the shop - but nothing beats mixing your own spices!

Unearthing the treasure within - the tender chicken


Preparation:

I'll hand over this section to the aforementioned chef.


Fearlessly Simple & Home Cooked

Hainanese Chicken Rice


Chicken Rice is understandably a celebrated dish in Singapore because it is lip-smacking, aromatic and can be enjoyed by people of all ages.  The main excitement of this dish is in the, you've guessed it - chicken.  There are all kinds, from fried to roasted.  You can easily get lost in delirium as you sink your teeth into the tender and juicy chicken meat.  

I've always wanted to make my own Hainanese Chicken Rice but was dismayed at hearing how complicated the chicken cooking process could be.  Until I found a video on it.  It's like a windfall!  With my Netbook in tow, I wasted no time in getting the ingredients out of the fridge and following the video instructions fastidiously.  The result was an absolutely succulent chicken without a sweat. It's unbelieveably simple to poach the chicken to perfection that you won't want to fry your chicken for this dish ever again. Poaching the bird is healthier than frying it, anyway.  Love the aroma of garlic and ginger throughout the house while cooking was in progress. If Fried Rice was Paradise, then this Hainanese Chicken Rice is Ecstasy.

Succulent and tender, the chicken skin will rip off the meat easily


Ingredients:

Chicken
1 whole fresh chicken
1 tbsp light soy sauce
6 slices fresh ginger
1 garlic, slightly bruised
2 shallots, chopped
1 tsp sesame oil
1 tbsp light soy sauce
1/2 tsp salt

Chicken Rice
3 cups long grain rice
2 tbsp cooking oil
2-3cm ginger, grated
3-4 garlic, chopped very finely or grated
1-2 tsp salt (to taste)
3 1/2 cups chicken stock from the boiled chicken or amount according to rice cooker instructions
2 pandan leaves (optional)

Chilli Dipping Sauce
10 fresh red chillies, seeds removed
1-2 garlic
5cm fresh ginger
2 tsp chicken stock (from the poached chicken)
Kaffir lime juice to taste
Salt to taste

Preparation:

1. Bring a large pot of water to a boil.  Rub chicken's inside with soy sauce. Grind ginger, garlic and one shallot. Stuff mixture into chicken.

2.  When the water boils, turn heat off.  Add remaining ginger and shallot into water and gently sink in the chicken into the hot water. Leave chicken in the water for one hour. After the first 5 minutes, lift up the chicken, drain the water from the stomach cavity and put chicken back in the pot. Repeat this process 2 to 3 times during the poaching period to make sure the chicken is cooked inside and outside.

3.  After 30 minutes, turn on the heat to bring the water back to just before boiling point, then turn heat off. Do not allow chicken to boil so it will be very tender and juicy from the poaching (boiling the chicken will harden it). At the end of the hour, raise the chicken from the water and gently rub it with the remaining soy sauce, sesame oil and salt.  Cut into bite-sized pieces to serve.

4.  Wash the rice in the rice cooker pot and drain well.  In a wok, fry the ginger and garlic with oil.

5.  Add the fried ginger and garlic to rice.  Sprinkle salt to taste.  Add water and pandan leaves.  Cook rice according to the rice cooker instructions.

6.  For the chilli sauce, grind chillies, garlic and ginger. Add chicken stock, lime juice and salt to taste.

7.  For chicken soup, ladle a small amount of chicken stock into serving bowls. Add finely chopped shallot.

Tips:
- Ensure that your pot is large enough to fit the whole chicken.
- If the chilli sauce tastes too hot, add a small amount of sugar into the sauce and squeeze a small amount of dark or sweet soy sauce when serving.
- The chicken skin gets very tender and succulent if chicken is correctly poached.  Handle the delicate bird with care.


Fearlessly Simple & Home Cooked

October 10, 2010

Singapore Satay


As this is my debut entry for the blog, I thought I'd give the honour to a popular dish that's not only linked to my heritage but also one which is not difficult to love at first bite - Satay. 

I've been a satay aficionado since I was able to pronounce the word.  As a child, I remember telling my Dad it didn't really matter what presents I would get for my birthday as long as I would get to wolf down satay all day. And boy, did he honour my wish, year after year. I've never had better birthdays!

It's worth noting that satay is not merely umarinated skewered meat. There's a pretty interesting mix of spices that's responsible for its aroma and delectable taste.  And then there's the equally appetizing peanut sauce in which you dip the satay.  Other accompaniments are cucumber slices, diced red onions and ketupat or lontong (traditional Malay/Indonesian rice cake). 

Fasten your seat belt because the moment you take your first bite, you will be on your way to a blissful makan* journey.  Bon voyage!

*Makan is Malay for "eat".

Ingredients:

(Makes 20+ sticks)
500 grams beef or any meat of your choice - slice the meat very thinly and into small pieces.
Bamboo skewers

Meat Marinade
2 lemongrass
1/2 inch ginger
1/2 inch galangal
1/2 cup cumin seeds
1/2 cup coriander seeds
1/2 cup sugar
1 tbsp tumeric powder
4 tbsp sweet soy sauce
4 garlic
4 onions
5 tbsp vegetable oil


Chopped lemongrass

Peanut Sauce
500 grams peanuts (fry with 2 tbs of oil, skin-on)
15 dried chillies (soak in warm water before use)
2 shallots or red onions, chopped
2 garlic, chopped
2 lemongrass, chopped on the bulb end
1/2 cup brown sugar
2 cups water
Salt to taste

Barbecue or grill the skewered meat

Preparation:

1.  Grind all ingredients for marinade until smooth.  Smear evenly on meat and marinade for 2 hours.  Skewer about 5cm of meat on the bamboo skewer.  Barbecue/grill skewered meat until cooked, occassionally brushing oil on it using the ends of 2-3 sticks of lemongrass.
2.  Coarsely grind all ingredients for peanut sauce except salt.  Cook in a saucepan over low fire, stirring occassionally.  Sprinkle salt to taste.  Turn off fire when sauce thickens.
3.  Serve cooked satay with peanut sauce, sliced cucumbers, diced onions and ketupat/lontong (optional).

Tips:

- For greater aroma, sautee the coriander and cumin seeds without oil before blending.
- Soak the bamboo skewers in cold water for 20 mins before using. This will help to prevent the sticks from burning.
- Brush the cooked satay with honey just before removing it from fire. This gives the dish a delightful sweetness.


Fearlessly Simple & Home Cooked