Showing posts with label Western. Show all posts

December 1, 2010

My Lazy Lasagne


I had cheated with my meringue dessert recipe (by using store bought meringues instead of making them) and now "lazy" is the adjective of choice for my lasagne dish.  In case I'd given you the impression that I'm a slothful cook who operates from a super messy kitchen littered with empty packages of instant mixes and microwave food (God forbid!), I'd better clarify that I am just a huge fan of efficiency.
 

Keep some bottles of this fabulous pasta sauce handy, in case laziness hits you
at the time when you need to obey your Italian food craving  

When translated to my cooking style, it means I am the sort who takes recipes with a pinch of salt, often modifying the ingredients and exploring alternative techniques that are within my means.  I do not relish complex and tediously long cooking methods, which just put me off.  I want to retain my keeness towards cooking, to use fresh ingredients most of the time but to also have the freedom to include modern provisions where I can.  Excuse me for seeking some relief but I would like to sum all that up as "smart cooking". Heehee.  Having said that, I indulge in demanding traditional cooking styles once in a while, when I'm less lazy, that is. 


I also stock up on canned champignons in case I run out of fresh mushrooms
when the recipe calls for them. 

I flipped through the Italian cook book in search of lunch ideas and decided on lasagne.  I wasn't exactly in the mood for elaborate cooking that afternoon, so the sight of bottled pasta sauce in my grocery drawer made me ditch the idea of cooking the Bolognese sauce from scratch as per the cook book.  (See Beef & Mushroom Spaghetti if you'd like to make your own sauce).  With some quick mental modifications of the original lasagne recipe, I amassed whatever I could from my drawer and fridge. Then, as if the spatula was my magic wand, the lasagne was ready in record time.  I wasn't the least bothered by how picture imperfect the lasagne had turned out because it tasted excellent.  I felt really satisfied with the outcome and slouched back on the couch for my post-cooking reading pleasure of Marian Keyes' latest fiction.  

My confidence was boosted later in the day when my husband repeatedly commented,"What superb lasagne this is!". It wasn't just a husband's show of random support but a genuine appreciation of deliciousness.  Now that wasn't fiction, thanks! 


(L to R): White sauce and Bolognese sauce; the layering process;
and the dish almost ready to be baked

Ingredients:
(Serves 4)

1 bottle Bolognese sauce (or make your own)
350g minced beef
12 dried lasagne sheets
1 tbsp olive oil
25g butter
1 can champignons - cut into halves
50g grated Parmesan cheese

For the white sauce
50g butter
25g plain flour
300ml milk
50g grated cheddar cheese


Preparation:

1.  Heat oven to 190*C.  Fry minced meat without oil until cooked.  Set aside.

2.  Heat olive oil and butter in a medium saucepan over a medium heat.  Add minced meat and mushrooms and cook gently until mushrooms are soft.  Add Bolognese sauce and mix well.  Remove from heat.

3.  Heat butter in a saucepan until melted.  Add flour and stir, then pour in the milk, stirring until teh sauce thickens and forms a smooth consistency.  Add cheese and stir to combine.

4.  Put 1/3 of meat sauce into teh base of a square or oblong baking dish; layer with 1/3 of the white sauce followed by the lasagne sheets.  Repeat the layers, finishing a layer of lasagne sheet topped with white sauce.  

5.  Sprinkle with Parmesan cheese and bake in oven for 25-30 mins until bubbling and brown on top.


Fearlessly Simple & Home Cooked

November 29, 2010

Cheat's Meringue with Berries & Cream


I discovered that food cravings can be quite creepy.  Recently on Facebook, I was exchanging information with B, one of my food loving friends in Singapore (we're Food Nation citizens, remember?).  Although we're physically separated by the vast and deep blue ocean, in our own private epicurism and without any coordination of any kind, we found out that we had been thinking about the same food for several days in a row.  Call that bewitching telepathy or simply like-minded gluttony.  Either way, her food thoughts were a dead ringer for mine and vice versa!
  

The store bought meringues are perfectly sweetened, crunchy
and flavoured (strawberry, vanilla, orange etc).  Toothsome!

For instance, a day after I made this meringue dessert (and without a clue that I had had it), B said she was entertaining the thought of having Eton Mess.  Now, that common craving was quite something as this British original is not a typical dessert of choice among us Singaporeans.  In other words, it's not as common as ice kacang (shaved ice dessert) or goreng pisang (banana fritter).  I had made this meringue dessert only because berries are in season here in Australia.  Seeing how foolproof the recipe was and what a pretty after dinner pleaser this dessert could be, I went to the shop and grabbed the ready made strawberry meringues.  Yes, ready made ones, hence the recipe title "Cheat's Meringue...".  I could have made them myself but I believe we all should take short cuts whenever we can so cooking remains enjoyable (what a perfect kitchen thief's excuse!).

So, with meringues and berries on hand, there's nothing much left for me to do.  I dunked the thickened cream into the mixer, gave it a good spin and voila!  A breathtaking dessert was born in a matter of minutes. The best part was it's totally fuss-free to prepare, looks stunning and tastes absolutely divine!  It's a definite crowd pleaser, so it's a must-have item on your menu when you're entertaining guests.  As for Eton Mess, the ingredients are the same, all you have to do is crush the meringue into a serving bowl and mess it up with the cream and berries.  It's called Eton Mess not for nothing :-D.


Ingredients:

Store bought meringues
Mixed berries - raspberries, blueberries, strawberries (frozen ones are fine)
Thickened cream


Preparation:

1.  In a mixer, beat the thickened cream for 2-3 minutes until fluffy.  Do not overbeat as otherwise cream will turn into buttermilk.

2.  Scoop cream onto 1 piece of meringue.  Top with berries.  Serve immediately.


Tips:

- The meringues are usually sweetened so there's no need to add sugar when beating the cream.  
- Prepare the dessert just before serving to keep the meringue crunchy.


Fearlessly Simple & Home Cooked

November 23, 2010

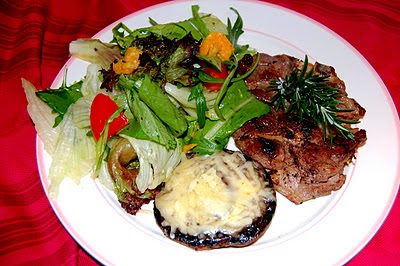
Lamb Chop with Cheesy Flat Mushroom & Salad


I put this meal together by accident. I mean, when I opened my fridge and saw lamb, mushrooms, cheese, yada, yada, yada I didn't have a clear concept of what I'd do with them.  I stared long and hard at those ingredients, long enough for my fridge to beep deafeningly, signalling that I'd left the door ajar for a while (and I think I heard it exclaim, "Make up your mind for a meal now!").  As I shut the fridge door and shifted my glare to the kitchen top, images of my favourite celebrity chefs (read: Jamie Oliver, Curtis Stone and the likes) played in my head.  Sorry to disappoint you, I wasn't fantasizing anything for mature audience only but I was recollecting recipes I've seen them make with similar ingredients I had on hand at that time.  Pure thoughts all the time!

I love the meaty and succulent taste of this Large Flat Mushroom
(Photo credit: taste.com.au)

Greek salad used to be my top favourite salad.  But eversince I started using freshly squeezed orange juice for my DIY salad dressing, I've never looked back.  It's so organic and refreshing.  I've managed to seduce my husband into loving orange salad as his ultimate favourite too.  I see that as an achievement because he's a true blue salad eater who most certainly knows what he wants in his greens.  So, there.  I would like to be a contender for "Swing Your Husband to Like Your Salad" reality TV contest, if there's any.  

I've never loved lamb so much until I came to Australia.  You can't blame me for having developed frequent "lamb cravings" because the meat here is so fresh, sweet and succulent everytime.  It's got to do with the fact that Australian lamb is entirely grass-fed, reared on pasture. Marvellous!  As we have heaps of rosemary growing in the garden, I didn't have to think twice about seasoning the lamb for this dish with the magical herb. The aroma is so delectable and therapeutic that it's almost aromatherapy on the grill.  And that flavourful, cheesy mushroom - I can't find a suitable expression to tell you how heavenly it is.  You've got to try it to understand my speechlessness.    


Ingredients:
(Serves 1)

250g lamb chop
1 large Flat Mushroom - remove stalk
3 tbsp shredded Mozarella cheese
2 leaves iceberg lettuce
2 leaves red lettuce
1/2 cup rocket salad
1 tomato - wedged
1/2 fresh orange
1 stalk fresh rosemary (optional)
Olive oil
Salt & pepper to taste


Preparation:

1.  Season lamb with salt & pepper.  Heat pan with 1 tsp olive oil.  Fry lamb (or grill it if you prefer) with rosemary herb on low-medium heat for 7-10 minutes on each side, then fry each side again on high heat for 2 minutes until lightly charred but meat is still tender.  Remove meat from heat.

2.  Season mushroom with salt & pepper.  Using the same pan (with the lamb flavour), sautee the mushroom 3-4 minutes on each side or until mushroom is softened and cooked.  Remove mushroom from heat.  Turn mushroom so the flat head is resting on a plate.  Sprinkle mozarella cheese onto the mushroom and microwave on high for 5 seconds (just enough for the cheese to melt onto the mushroom).

3.  In a salad bowl, combine all vegetables.  Add 2 tbsp olive oil, salt & pepper.  Squeeze orange juice onto salad, scrape the leftover orange pulps and add them to the salad.  Toss salad to harmonize the ingredients.

4.  Serve lamb, mushroom and salad on a plate.


Tips:

- You can vary the vegetables for salad to your liking.
- Orange can be substituted with lemon or grapefruit.
- Serve with BBQ/ketchup/chilli sauce, if desired.


Fearlessly Simple & Home Cooked

November 19, 2010

My Blackforest Cake


I had stated "My" Blackforest Cake as the title for this confectionery because as you can see from the picture, the cake looks pretty unfinished, unrefined and sits on a weird base paper that I had amateurishly torn and recycled from my kitchen.  The truth is, I'd never participated in any cooking or baking class before to care about how the cream should be professionally plastered onto my cake.  So, in case any cake connoiseur raises the alarm that this is not a bonafide or conventional blackforest cake, I'd better claim responsibility from the onset for making it look a little queer.  As a token of self-pity for my lack of cake decorating skills, I would like to say it's my personalised version of the cake.  No harm done to the gorgeous taste of the cake, though.  Thank God ;)

I have to confess that the freshness of a homemade cake is so remarkable that it convinces me even more that we shouldn't buy food if we can help it.  Cook your own - it's healthier, fresher and more satisfying 

It was my husband's birthday and he loves his Blackforest Cake.  I've enjoyed cooking so much since I came to Australia that I even decided to make a birthday cake instead of buying one for him.  With Morello and fresh cherries going for a song here, I didn't take long to propel into cake making motion.  I didn't have any cream piping bag but was not very keen to drive out just to get one optional apparatus.  Towards the end of the cake making process, I arranged the cherries on the cake and apologetically said to my husband, "This must be one of the ugliest cakes you've ever seen in your life".  He smiled and took the first bite.  Then like an ego fertiliser for me, his eyes shut in contentment and lips spread in a small smile (I would like to believe that's a universal body language which means "heavenly!").  He gleed in delight and moved on to the second bite, the third, the fourth, the fifth...and I gave up counting! 


Ingredients:

2/3 cup self-raising flour
2 tsp cocoa powder (optional)
4 eggs - separate whites from yolks
1/2 cup castor sugar (for cake)
1/2 cup sugar (for cherries)
1 1/2 cups cream
425g pitted Morello or canned cherries
Grated chocolate or chocolate flakes
Fresh or maraschino or canned cherries for decoration


Preparation:

1.  Pre-heat oven to 180*C.  In a saucepan, mix Morello cherries with sugar and cook over low heat for 7 minutes, stirring it occasionally.  Turn heat off.  Transfer into a bowl, let cherry mixture cool down before refrigerating it for about 1 hour.    

2.  Brush the base of a round baking tin (20cm wide) with butter.  Lace the base and sides with baking sheets.  Set aside.

3.  In a cake mixer, beat egg white until fluffy.  Add sugar, one spoon at a time.  Continue to beat mixture until sugar is dissolved and mixture appears shiny.  Add egg yolks and beat for a further 20 seconds.  Turn off the cake mixer.  

4.  Add cocoa and self-raising flour.  Using a spatula, gently fold in the mixture.  Transfer into the baking tin and bake cake for 15-20 minutes until cake is fully cooked.

5.  Take cake out of oven and let it cool in the baking tin for 5 minutes before transferring it out onto a cooling rack.  When cake is cooled, slice into halves at the middle section, overturning the halves so that both the sliced surfaces are facing up.  These are the surfaces that you will be working the cream on later.

6.  In a cake mixer, beat the cream for 2-3 minutes.  Do not overbeat as cream will turn into buttermilk with overbeating.

7.  Working on one of the sliced halves of the cake, smear the cream on the surface.  Top the creamed surface generously with the sweetened and cooled Morella cherries.  Cover the layer with the other slice of the cake so they become sandwich-like.  Smear the remaining cream all over the cake's surface and sides.  Decorate the cake with grated chocolate and cherries to your liking.  


Tip:

- Cake is best served chilled.  When left in the fridge, remember to cover the cake with a cake cover as otherwise the cream will harden.

- I didn't add cocoa powder to my cake mixture, as it's optional. I had also sliced the cake into 3 layers instead of 2.  Use your creativity and customise the cake according to your liking. 
       

Fearlessly Simple & Home Cooked

November 11, 2010

Berry Sweet Dreams Tiramisu-in-a-Cup


I received feedback from several friends in Singapore that while they're smitten by how easy it is to make Tiramisu from my home made video, mascarpone cheese has proven to be either costly in Singapore (which means it's cheaper to buy Tiramisu per se) or mysteriously elusive.  Poor things! I felt an urge to salvage them from their predicament.  I mean, when something is almost effortless to make, one must try it against all odds.  So, like a superheroine on a "keep cooking skills alive!" mission, I embarked on a reading adventure for alternative recipes for Tiramisu.


This version of Tiramisu gives me a feeling like I'm eating a yoghurty ice cream. 
A nice sensation especially when the berries burst in the mouth

Like a stroke of genius divine intervention, help came in the most convivial way.  I was grocery shopping at Coles when a neat display of recipe books in the freezer poked my curiosity.  Yes, books in freezer.  It's not an everyday sighting, is it? What attracted me more was this notice: FREE with any purchase of 3 Philadelphia cheeses.  I wasn't thinking about buying cheese when I entered the supermarket but as any Marketing guru would gladly tell you (and being a Marketing graduate myself, I should've known better) women's buying behaviour is very peculiar.  Actual purchases will often veer very far from the original intent.  I was about to prove that Marketing theory right. 

Needless to say, I ended up with 3 cream cheeses that I hadn't planned on buying.  As though aiming for a self consolation, I actually heard myself say, "No regrets, this could be part of your heroic mission".  Going by the printing date on the recipe book, it just got off the press with a RRP of nearly A$40.  Price for the 3 cream cheeses?  Just under A$12. Ka-ching! Smart shopping or impulse purchase, either way a free glossy recipe book is to me, a treasure to behold (another self-consolation, I fear).  And then like a happy ending to a sweet dessert fairy tale, I found the alternative Tiramisu recipe right there in the book.  Using the cream cheese I had impulsively purchased and as if on cue, I heard Eurythmics' "Sweet Dreams Are Made of This" throbbing in my head as I tried out this version of Tiramisu.

PS: This one tastes quite different from the conventional Tiramisu.  After trying both types, you decide which one you prefer.

The free recipe book by Philadelphia.  I'm on a recipe book addiction, somewhat!

Ingredients:
(Makes 4 glasses)

250g Philadelphia cream cheese (or any brand) - softened at room temperature
4 tbsp castor sugar (more if you prefer it sweeter)
1 egg yolk
1/2 tsp vanilla essence
1 punnet combined berries (raspberries, blueberries & strawberries)
8 savoiardi biscuits (sponge fingers) - break into halves, lengthwise
1 bowl of hot instant coffee
Finely chopped chocolates/ cocoa/ drinking chocolate for garnishing


Preparation:

1.  Whisk cream cheese with sugar until combined.

2.  Add egg yolk and vanilla essence, whisk until mixture is completely smooth.  Be careful not to whisk for too long to avoid a watery outcome.

3.  Put berries at the bottom of the serving glass.  Pour a good amount of the cream cheese mixture until just before the brim.

4.  Dip the savoiardi biscuits quickly into the hot coffee (do not soak the biscuits) and place 3-4 pieces upright into the cream cheese mixture in the serving glass.  Sprinkle with chocolates.  Serve immediately.


Tips:

- This dessert takes only 10-15mins to prepare, so make it only just before serving time.
- Frozen berries can be used but thaw them ahead of use to avoid melted ice at the bottom of the glass.


Fearlessly Simple & Home Cooked

October 31, 2010

Tiramisu: A Dessert Sin Everyone Loves to Commit


*Tiramisu/ˌtɪr əˈmi su, ‐miˈsu/ [tir-uh-mee-soo, ‐mee-soo] –noun. an Italian dessert with coffee and liquor-soaked layers of sponge cake ...

Dessert...Coffee...Cake...what else do you need to accelerate your heartbeat, titillate your senses and delight your emotion? 

I believe this alluring Italian dessert has been a key witness to numerous joyful moments and countless happy people all over the world, many times over.  Notwithstanding the post-enjoyment guilt typically suffered by the calorie watchers, it is one sinful indulgence that is very hard to resist even by the most dyed-in-the-wool gym zealot.  (Just admit it, no one's watching you!) 

As coffee is my paramount addiction, it was reason enough for me to whip up this non-baking cake, which I must emphasise is so easy to make that you would be wondering why you had ever paid that overpriced restaurant so much for it.  My other main motivation for making Tiramisu was to make a non-alcoholic one as my diet is Halal.  With mascarpone cheese in Australia costing a fraction of what I would be paying in Singapore, I felt I shouldn't procrastinate any longer (sorry, my country comrades but you folks got to try making this at home lah!).  

Making this dessert was so much fun, eating it later was pure bliss!  With my husband acting as my cameraman, I got down to making an instructional video on how to make Tiramisu just for you.  Enjoy!  

PS: The video was shot before I launched this blogsite, so pre-launch info on my food blog (which is this!) is obsolete.  


Ingredients:

4 egg yolks
2 egg whites
10 tablespoons caster sugar
250g mascarpone cheese
1 bowl espresso coffee
10 sponge fingers (savoiardi)
2 tsp vanilla essence
Good quality cocoa powder

Others
Baking dish (at least 6cm deep)


Preparation:

Watch video :)


*Source: Dictionary.com


Fearlessly Simple & Home Cooked

October 25, 2010

Beef & Mushrooms Spaghetti


Happy World Pasta Day! 

I have cooked this pasta dish countless times but each time I do it, I get so much joy.  It's got to do with it being one of my husband's all time favourites.  What's a better flavour enhancer than happiness and love?  We love mushrooms in our pasta, the thicker and the more, the merrier.  Most recipes will tell you about the usual ingredients such as tomatoes, minced meat and all. But truly, I have found a little secret for the perfect sauce (besides love and happiness).  Because you, my dear readers mean a lot to me, I will share that secret with you.  

Mushrooms bring a wonderful flavour to dishes

It's sugar.  When there's so much acid oozing from the wonderful tomatoes, the perfect balance for it is none other than good 'ol sugar.  It brings a magical twist to the otherwise sour sauce.  The sensational burst of flavour combined with the aromatic herbs will have everyone at home ditching their favourite Italian restaurants for your very own Spag magic!  Grab your fork and spoon and start twirling your pasta.  Delizioso!

Meat and mushrooms in harmony in my pot

Ingredients:
(Serves 4-5 people)

1 tablespoon olive oil
750g ground beef
1 large brown onion, diced
2 garlic, chopped
2 tbs tomato sauce
1 cup carrot, grated
400g fresh tomatoes, diced OR 1 tin (400g) whole tomatoes, drained
150g swiss mushrooms, sliced
3-4 sprigs fresh thyme (or 1 tsp dried thyme)
2 bay leaves
4 tbs sugar
2 tbs butter
Salt & pepper
Parmesan cheese for garnishing

Preparation:

1. In a medium pot, sauté ground meat in olive oil, salt & pepper until brown and the meat juice evaporates.

2. Add mushrooms and onion, sauté for 1-2 minutes.  Stir in garlic and tomato sauce.

3. When meat is coated with the tomato sauce and looks reddish, add carrot and diced tomatoes.  Stir all ingredients to thoroughly combine them. 

4. Add thyme, bay leaves and butter.  Stir lightly.

5. Place lid on pan, bring ingredients to a boil, turn heat down to a simmer and cook for 20 minutes, stirring occasionally.

6. Add sugar, salt & pepper to taste.  Turn heat off, leave sauce to rest for about 10 minutes.

7. Cook spaghetti according to packet instructions.  Drain the spaghetti and serve meat sauce over the pasta.  Garnish with grated parmesan cheese.


Tips:
- Do a taste test and add or subtract seasoning (salt, pepper, sugar) to your liking.  Hint: Kids love a sweeter pasta sauce!


Fearlessly Simple & Home Cooked

October 16, 2010

Scotch Fillet Beef Steak with Juicy Orange, Beetroot & Tomato Salad


THE NAKED CHEF.  No, not me.  These three cheeky words refer to the TV cooking series by Jamie Oliver in the late 90s, of course.  Since then, they have become synonymous with the Welsh celebrity chef who speaks with a cute pronounced lisp.  I have been revelling in his awesome cooking shows for almost a decade now.  If I could name any one particular chef who has managed to singlehandedly break down all barriers of complicated cooking, it will unquestionably be Jamie Oliver.

I could say this Scotch Fillet Beef Steak with Juicy Orange, Beetroot & Tomato Salad dish I created has been inspired by Jamie. I love salad but after each intake, ironically I would often feel uneasy rather than pleased for having eaten something so raw and healthy.  One day, I nabbed the culprit - it's the salad dressing!  The mayonnaise, cream and heaven-knows-what-else those manufacturers put in their products have left my tummy feeling queasy most times.  And then, I'm vinegar-intolerant. If those aren't reason enough to start making my own salad dressing, I don't know what will. 

So, when I watched how Jamie easily made salad dressing out of orange juice, I screamed EUREKA!    


Beef so tender, salad so refreshing. 
Through this dish delicious, healthy food has taken on a new meaning.
 

Ingredients:

(Single serving)
200 grams scotch fillet beef steak
1 cup rocket salad
3 leaves red leaf lettuce, shredded
3 leaves green leaf lettuce, shredded
2 tomatoes, diced
3 slices canned beetroot, diced
1 orange
Olive oil
Salt and pepper to taste


Preparation:

1. Season beef with salt and pepper.  Pan fry with a dash of olive oil over medium heat for 7 minutes on each side.  When cooked, take beef off the pan and slice it in 2cm strips.

2. Put all vegetables into a salad bowl and splash with 1 tablespoon of olive oil.

3.  Cut orange into halves.  Squeeze juice of half orange on the salad vegetables, scrape the remaining orange flesh from the skin and drop them into the salad.  Peel skin off the other half of the orange.  Dice the flesh and add the to salad.

4.  Sprinkle salt and pepper to taste.  Toss the salad to combine the ingredients well.  Ready to serve with the beef.


Tips:

- Don't be afraid to toss the salad with your clean hands.  It makes the ingredients come together nicely.
- If you prefer a well-done steak, increase the beef frying time for each side by about 5-7 minutes.


Fearlessly Simple & Home Cooked

October 15, 2010

Homemade Beef Burger


Fast food.  Who doesn't like them regardless of how many times we've been reminded that they triumph in the category of junk food?  Remember "Supersize Me"?  It appears that the documentary hasn't deterred many of us from gobbling up burger after burger.  And as if defying all healthy living advices, we drown ourselves with colas and bellow in unison - I'm Loving It!  Hands up - YOU, YOU, YOU, ME!  Guilty as charged!  

Ever been disappointed by how the puffy, sesame seed coated bun you see on the glossy posters turns out to be flat and shrunk on your tray?  Welcome to the world of Food Make-up Artist.  I figured I should embark on a personal crusade to stop the deception, pronto.  With beef in top notch quality here,  there's also no reason to eat sub-standard processed meat to get my burger fix.  I was only too happy to make my homemade beef burger patty from fresh red meat we ground at home.  I then assembled the burger by piling on pickled cucumbers, sauteed mushrooms and cheese.  Voila! WYSIWYG - what you see is what you get.

It's so simple, even your six-year-old can help out.  Because it's homemade you know exactly what goes into your burger - the portion of meat you use, the oil you prefer and even customised toppings to suit your mood.  Count the calories if you must and add or subtract the meat portion as you like.  Supersize your burger without going on a guilt trip - how does that sound to you?

Ingredients:

(Makes 8+ burgers)
Hamburger buns
Sauteed wild mushrooms
Pickled cucumbers, sliced
Iceberg lettuce, shredded
Cheddar cheese, sliced

For beef patty
650 grams ground beef
4 garlic, chopped
1 large brown onion, chopped
1/4 cup fresh continental parsley, chopped
4 tbsp breadcrumbs
1 egg
1 tbsp butter (if non-fatty meat portion is used)
1 tbsp Worcestershire sauce or BBQ sauce
Pepper & salt to taste

Preparation:

1.  Mix all beef patty ingredients in a large bowl with your hand.  Ensure they are well mixed before covering the bowl with a plastic wrap and leaving the mixture to set in the fridge for 30 minutes.

2.  Grab the beef patty mixture, slighly smaller than the size of your palm.  Roll it into a ball and flatten it to abt 10cm in diameter.

3.  Heat olive oil in a non-stick pan.  Fry beef patty over medium-low heat, pressing it occassionally.  You can use the flat surface of your hand-held metal potato masher for this.  Cook meat thoroughly.

4.  Cut burger bun into halves and place them on the heated pan for about 30-50 seconds.  This will give a toasted crispy surface onto which you will place the cooked patty. 

5.  Pile the burger to your preference with the accompaniments like mushrooms, cheese, sauces, etc.


If the goodness of homemade burger still doesn't get you moving, watch this video and think again.  I had fun seeing my students' reactions when I showed this video during one of the previous Marketing lessons I taught.


Fearlessly Simple & Home Cooked